Threading in Python
Python has become the de-facto language framework for writing machine learning code due to its rich modules ecosystem especially in the data science realm.
By default, Python uses a single CPU thread to execute the code. This is largely due to GIL (Global Interpreter Lock) as single thread is safe to prevent corrupted output caused by race condition. While thread-safe is good, it does come with a price - the allocated/available CPU resource is often underutilized and it takes longer time to run the code. Today, there are ways to improve performance by using some modules with the likes of multithreading and multiprocessing but this must be done carefully because there’s always a reason for GIL to exist. At first glance, the term multithreading sounds promising to speed up a particular Python program. Let’s run some experiments to find out if this is really the case.
The following experiments are carried out using Cloudera Machine Learning (CML) on Kubernetes platform powered by Openshift 4.8 with the hardware specification as described below. CML is embedded with workbench and Jupyterlab notebook IDE for data scientist to do coding, EDA, etc. In this experiment, the CML workbench is used as it is lightweight, quicker to spin up and easy to use.
| CPU | Intel(R) Xeon(R) Gold 5220R CPU @ 2.20GHz |
| Memory | DIMM DDR4 Synchronous Registered (Buffered) 2933 MHz (0.3 ns) |
| Disk | SSD P4610 1.6TB SFF |
- Single Thread in Python
- Multithreading in Python
- concurrent.futures.ThreadPoolExecutor in Python
- concurrent.futures.ThreadPoolExecutor with Lock in Python
Single Thread in Python
Create a CML workbench session with 1 CPU/2 GiB memory profile. Open a
Terminal Accessbox and run thetopcommand to check the total threads spawned by the process ID of this session pod. In this example, the process ID is 94. Note that there are 30 threads being opened by the process for this running session pod.$ top -p 94 -H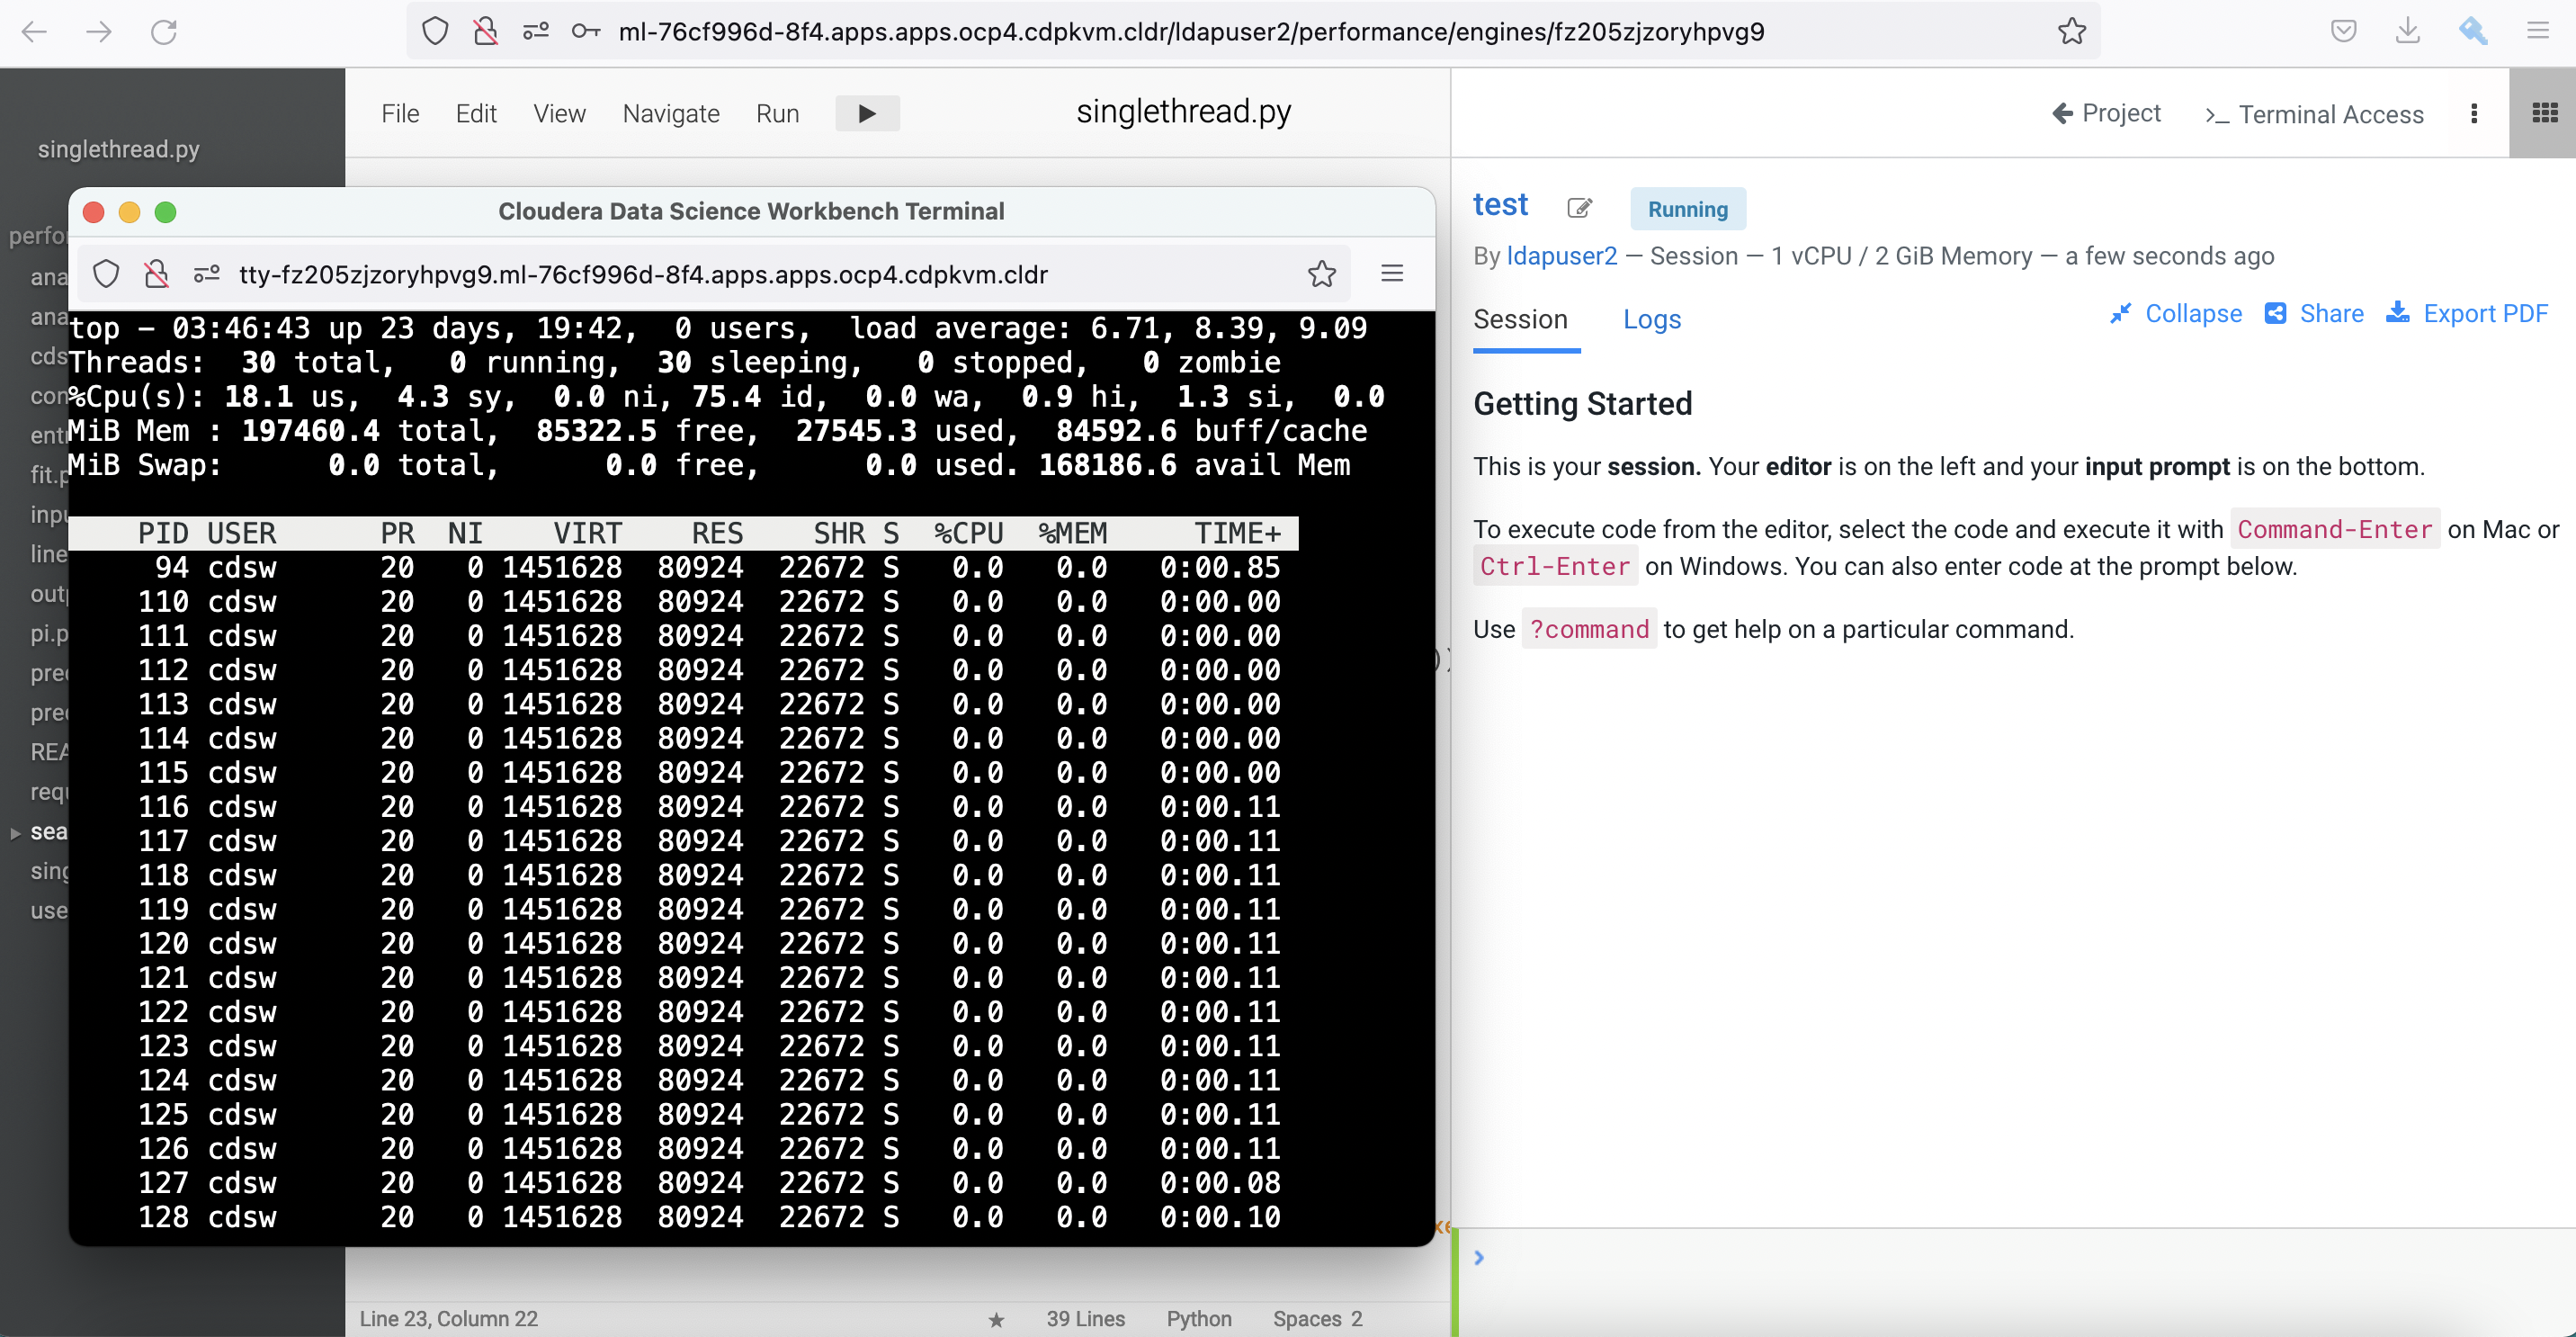
Create a simple
inputfile with the following Bash script in the terminal console.$ > input;for i in {1..20};do echo line$i >> input;done; head -20 input line1 line2 line3 line4 line5 line6 line7 line8 line9 line10 line11 line12 line13 line14 line15 line16 line17 line18 line19 line20Create a new file and copy this Python script into the workbench and run it. This script is coded to read line by line from the
inputfile and write each line into theoutputfile in a sequential manner.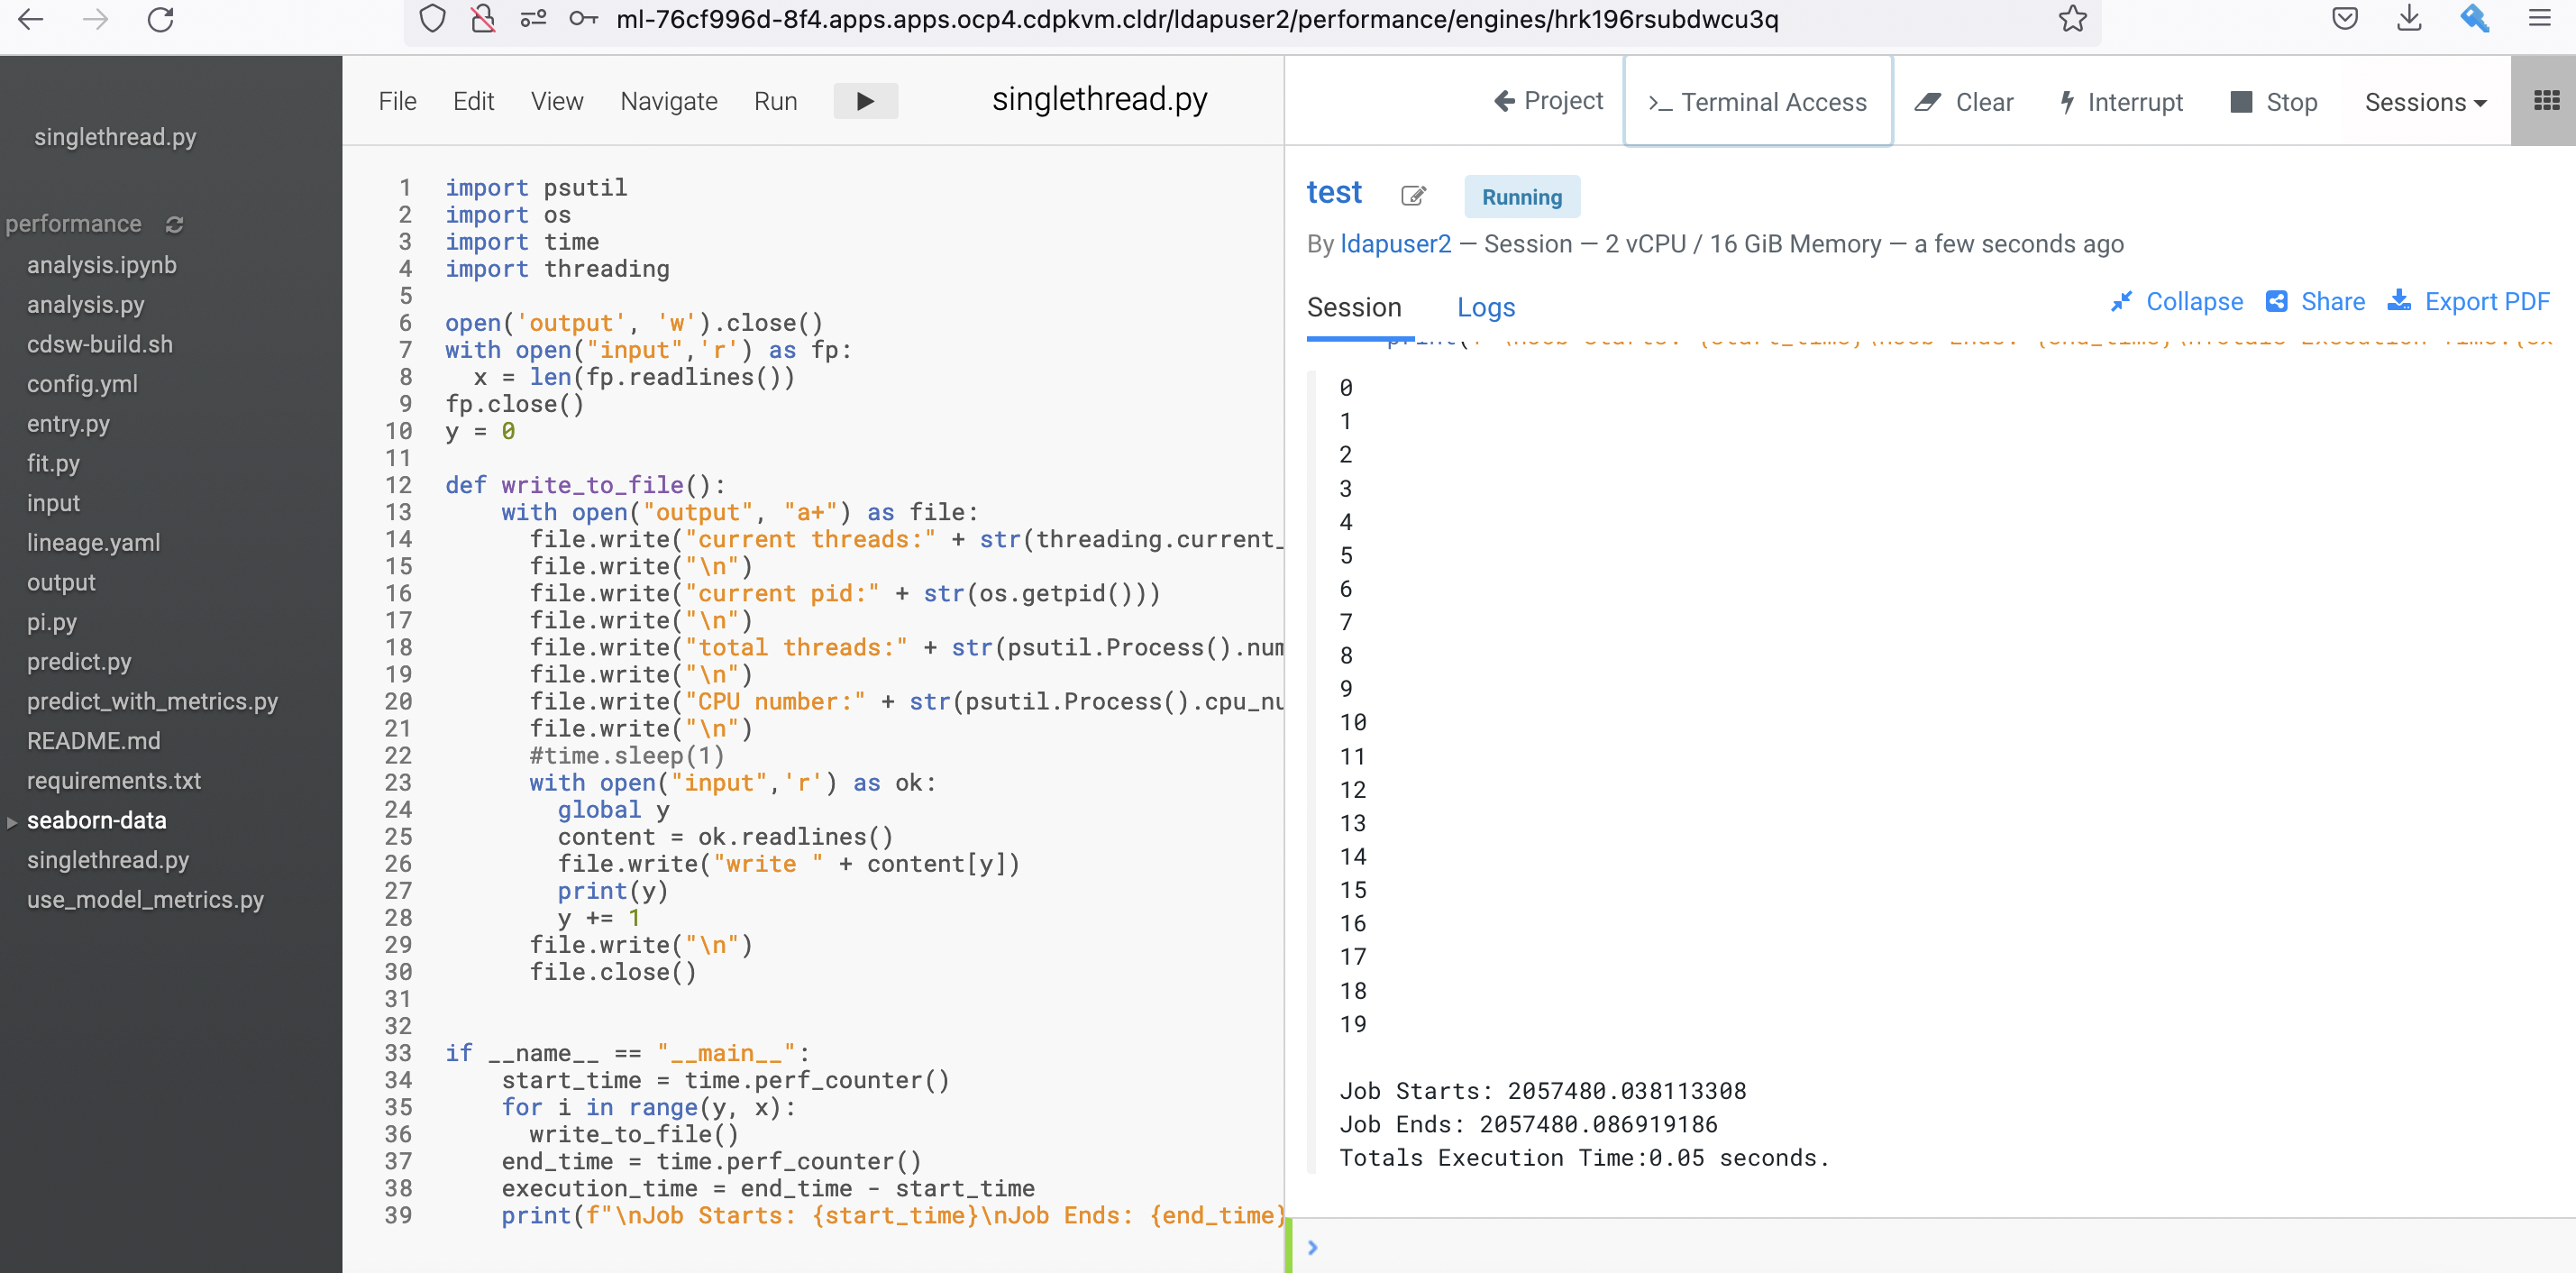
After the process is completed, check the outcome of the
outputfile. It shows details such as current CPU thread core of the hosting node, current pid, total of threads, which CPU core is scheduled to run the program at specific point of time and finally the read/written line. As expected, the code writes each line number to theoutputfile sequentially without data corruption as Python runs the code linearly with a single Mainthread process.$ more output current thread:<_MainThread(MainThread, started 140555361314624)> current pid:94 total threads:30 CPU number:6 line1 current thread:<_MainThread(MainThread, started 140555361314624)> current pid:94 total threads:30 CPU number:6 line2 current thread:<_MainThread(MainThread, started 140555361314624)> current pid:94 total threads:30 CPU number:6 line3 current thread:<_MainThread(MainThread, started 140555361314624)> current pid:94 total threads:30 CPU number:6 line4 current thread:<_MainThread(MainThread, started 140555361314624)> current pid:94 total threads:30 CPU number:6 line5 current thread:<_MainThread(MainThread, started 140555361314624)> current pid:94 total threads:30 CPU number:6 line6 current thread:<_MainThread(MainThread, started 140555361314624)> current pid:94 total threads:30 CPU number:6 line7 current thread:<_MainThread(MainThread, started 140555361314624)> current pid:94 total threads:30 CPU number:6 line8 current thread:<_MainThread(MainThread, started 140555361314624)> current pid:94 total threads:30 CPU number:6 line9 current thread:<_MainThread(MainThread, started 140555361314624)> current pid:94 total threads:30 CPU number:6 line10 current thread:<_MainThread(MainThread, started 140555361314624)> current pid:94 total threads:30 CPU number:6 line11 current thread:<_MainThread(MainThread, started 140555361314624)> current pid:94 total threads:30 CPU number:6 line12 current thread:<_MainThread(MainThread, started 140555361314624)> current pid:94 total threads:30 CPU number:6 line13 current thread:<_MainThread(MainThread, started 140555361314624)> current pid:94 total threads:30 CPU number:6 line14 current thread:<_MainThread(MainThread, started 140555361314624)> current pid:94 total threads:30 CPU number:6 line15 current thread:<_MainThread(MainThread, started 140555361314624)> current pid:94 total threads:30 CPU number:6 line16 current thread:<_MainThread(MainThread, started 140555361314624)> current pid:94 total threads:30 CPU number:6 line17 current thread:<_MainThread(MainThread, started 140555361314624)> current pid:94 total threads:30 CPU number:6 line18 current thread:<_MainThread(MainThread, started 140555361314624)> current pid:94 total threads:30 CPU number:6 line19 current thread:<_MainThread(MainThread, started 140555361314624)> current pid:94 total threads:30 CPU number:6 line20Let’s recreate the file with more entries and rerun the abovementioned Python code.
$ > input;for i in {1..10000};do echo line$i >> input;done; head -20 inputObserve the processing time taken by Python to run the code. Run a few times to ensure consistent result. In this case, it takes approximately 32 seconds to run the program with the intended outcome.
 Job Starts: 2071176.127430943
 Job Ends: 2071208.742637604
 Totals Execution Time:32.62 seconds.
Multithreading in Python
Let’s shift gear a bit by executing the similar code with Threading module.
Create a CML workbench session with 1 CPU/2 GiB memory profile.
Run this Python script. Use the same
inputfile with 10000 entries. Similar to the previous script, the script is amended by adding Threading class module.After the process is completed, check the outcome of the newly generated
outputfile. It shows the process uses multiple threads to run the code as indicated below.$ more output current thread:<Thread(Thread-3, started 139772086433536)> current pid:97 total threads:31 CPU number:1 line1 current thread:<Thread(Thread-4, started 139772086433536)> current pid:97 total threads:31 CPU number:1 line2 current thread:<Thread(Thread-5, started 139772086433536)> current pid:97 total threads:31 CPU number:1 line3 current thread:<Thread(Thread-6, started 139772086433536)> current pid:97 total threads:31 CPU number:1 line4 current thread:<Thread(Thread-7, started 139772086433536)> current pid:97 total threads:31 CPU number:1 line5 current thread:<Thread(Thread-8, started 139772086433536)> current pid:97 total threads:31 CPU number:1 line6 current thread:<Thread(Thread-9, started 139772086433536)> current pid:97 total threads:31 CPU number:1 line7 current thread:<Thread(Thread-10, started 139772086433536)> current pid:97 total threads:31 CPU number:1 line8 current thread:<Thread(Thread-11, started 139772086433536)> current pid:97 total threads:31 CPU number:1 line9Next, check the integrity of the output file. To reiterate, the purpose of this code is to read line by line from the
inputfile and write each line into theoutputfile in a sequential manner. Run the following script. In the event of no output, it concludes that the code achieves the intended outcome without data corruption. In this case, the result shows the same outcome as of the previous test (using single thread). It signals that the outcome is safe-thread when using the correct method.$ cnt=0;for i in `cat output | grep line`; do cnt=`expr $cnt + 1` ; if [ $i != line$cnt ]; then echo $i;fi ; doneHowever, the processing time taken by Python to run this code with multithreading is longer with approximately 50 seconds!
 Job Starts: 2071685.346476694
 Job Ends: 2071735.755200198
 Totals Execution Time:50.41 seconds.
concurrent.futures.ThreadPoolExecutor in Python
Now let’s add concurrent.futures.ThreadPoolExecutor module to run the same code with the same intended outcome.
Run this script in the CML workbench session.
The processing time taken by Python to run the code with concurrent.futures.ThreadPoolExecutor module is shorter at 24 seconds. Great!
 Job Starts: 2070084.875582402
 Job Ends: 2070109.707474271
 Totals Execution Time:24.83 seconds.
Explore outcome of the newly generated
outputfile. It shows that the process spawns 10 threads (defined by the number of workers) to run the code. The total threads before the running code was 30 and has increased to 40 when executing the code.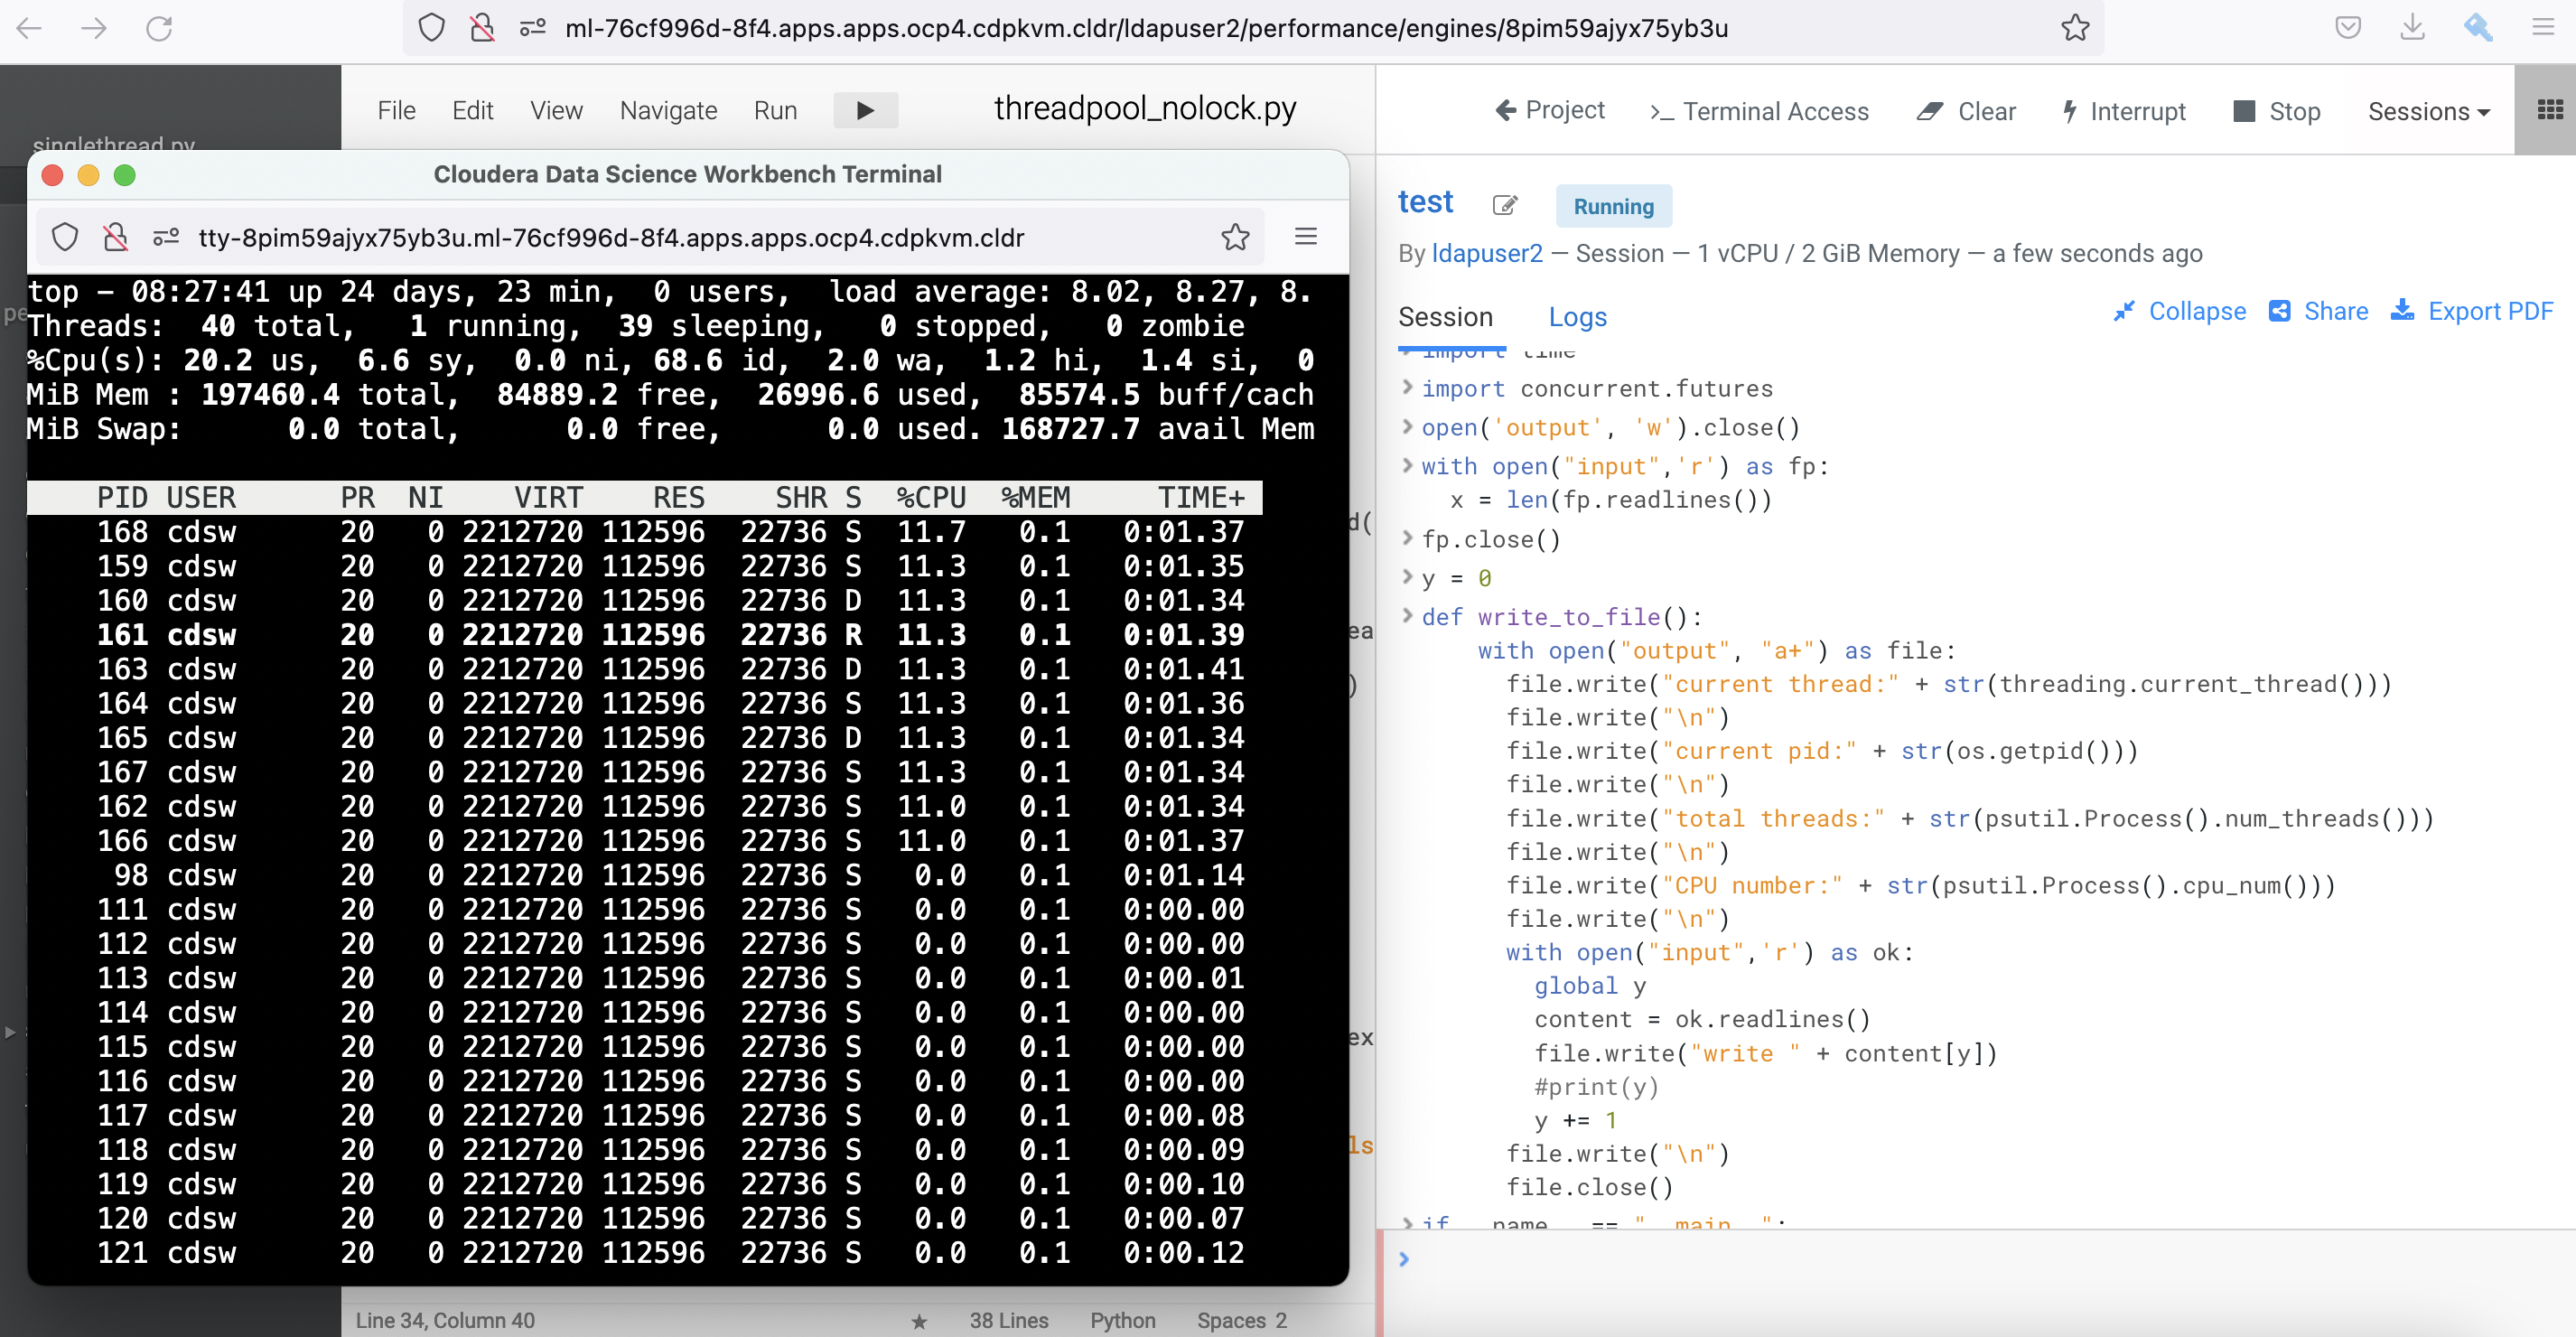
 current thread:<Thread(ThreadPoolExecutor-0_1, started 139664655841024)>
 current pid:98
 total threads:36
 CPU number:2
 line1

 current thread:<Thread(ThreadPoolExecutor-0_3, started 139664639055616)>
 current pid:98
 total threads:36
 CPU number:2
 line2

 current thread:<Thread(ThreadPoolExecutor-0_0, started 139664664233728)>
 current pid:98
 total threads:36
 CPU number:2
 line3

 current thread:<Thread(ThreadPoolExecutor-0_2, started 139664647448320)>
 current pid:98
 total threads:38
 CPU number:2
 line4

 current thread:<Thread(ThreadPoolExecutor-0_5, started 139664283399936)>
 current pid:98
 total threads:40
 CPU number:2
 line5

 current thread:<Thread(ThreadPoolExecutor-0_1, started 139664655841024)>
 current pid:98
 total threads:40
 CPU number:2
 line6

 current thread:<Thread(ThreadPoolExecutor-0_4, started 139664630662912)>
 current pid:98
 total threads:40
 CPU number:2
 line7

 current thread:<Thread(ThreadPoolExecutor-0_6, started 139664275007232)>
 current pid:98
 total threads:40
 CPU number:2
 line8

 current thread:<Thread(ThreadPoolExecutor-0_8, started 139664258221824)>
 current pid:98
 total threads:40
 CPU number:2
 line9

 current thread:<Thread(ThreadPoolExecutor-0_0, started 139664664233728)>
 current pid:98
 total threads:40
 CPU number:2
 line10

 current thread:<Thread(ThreadPoolExecutor-0_4, started 139664630662912)>
 current pid:98
 total threads:40
 CPU number:2
 line11

 current thread:<Thread(ThreadPoolExecutor-0_9, started 139664249829120)>
 current pid:98
 total threads:40
 CPU number:2
 line12

 current thread:<Thread(ThreadPoolExecutor-0_3, started 139664639055616)>
 current pid:98
 total threads:40
 CPU number:2
 line13

 current thread:<Thread(ThreadPoolExecutor-0_7, started 139664266614528)>
 current pid:98
 total threads:40
 CPU number:2
 line14
Subsequently, check the integrity of the output. Run the following script to check if the code writes each line number to the
outputfile sequentially. The result is negative.$ cnt=0;for i in `cat output | grep line`; do cnt=`expr $cnt + 1` ; if [ $i != line$cnt ]; then echo $i;fi ; done line26 line25 line41 line40 line84 line83 line96 line95Excerpt from the
outputfile:current thread:<Thread(ThreadPoolExecutor-1_9, started 139664249829120)> current pid:98 total threads:40 CPU number:2 line26 current thread:<Thread(ThreadPoolExecutor-1_8, started 139664283399936)> current pid:98 total threads:40 CPU number:2 line25 current thread:<Thread(ThreadPoolExecutor-1_0, started 139664258221824)> current pid:98 total threads:40 CPU number:2 line27The outcome is not in line with the intention of the code. The line number is not written sequentially beginning from line26. Unlike the previous outcome, the line numbers are no longer in sequence, e.g. line25 is written after line26 by ThreadPoolExecutor-1_8 and ThreadPoolExecutor-1_9 respectively. This is the behaviour of race condition as a result of multiple threads writing into the same file in parallel. In other words, concurrent.futures.ThreadPoolExecutor is not thread-safe (without locking mechanism) despite able to complete the program at a faster speed.
concurrent.futures.ThreadPoolExecutor with Lock in Python
Now let’s use concurrent.futures.ThreadPoolExecutor module with locking mechanism to run the code with the same intention.
Run this script in the CML workbench session.
Next, check the integrity of the output. Run the following script to check if the code writes each line number to the
outputfile sequentially. The outcome matches the objective with sequential entries in place.$ cnt=0;for i in `cat output | grep line`; do cnt=`expr $cnt + 1` ; if [ $i != line$cnt ]; then echo $i;fi ; doneThe processing time taken by Python to run the code with concurrent.futures.ThreadPoolExecutor with Lock module is now taking longer than the code with single thread despite 10 workers/threads are spawned.
 Job Starts: 2077114.640889352
 Job Ends: 2077154.378118582
 Totals Execution Time:39.74 seconds.
Let’s rerun the same test by adjusting
max_workers=1. Ironically, the speed is almost similar to that of running the script using the default single thread process.Job Starts: 2078032.097896568 Job Ends: 2078064.409348964 Totals Execution Time:32.31 seconds.While introducing lock in concurrent.futures.ThreadPoolExecutor module ensures integrity of the outcome, it comes with a price of lower speed because only one thread can obtain the lock at a time. Other threads need to wait for the lock to be released.
Conclusion: At first glance, multithreading sounds promising to enhance the speed to run specific Python code. In reality, the outcome depends heavily on how the code is written and most importantly whether or not it achieves the end goal. While running a Python code with more threads could be faster but it might not necessarily achieve the intended outcome. Single thread could work faster than multithreading for ensuring a high degree of integrity. In addition, creating multiple threads will also creates resource overhead. In a nutshell, applying multithreading will not guarantee highest performance and could lead to a backfire as it might effectuate data corruption as witnessed in the above experiments. Lastly, GIL still exists for a reason :)